
Full VPN Setup for pfSense Router - OpenVPN Client
1. Log into your pfSense gateway.
2. Navigate to System -> Cert Manager -> CAs.
3. If there are any certificates on this page, remove them with the trashcan icon to the right.
5. Download CA certificate file from here https://network.glbls.net/openvpnconfig/serverlocation.crt and open it on Wordpad for Windows or TextEdit for Mac, then COPY and PASTE to “Certificate data” field. Enter “CA-OpenVPN” to “Descriptive name”.
9. Click on Add in the lower-right to add a new VPN connection.
Protocol: UDP or TCP (we recommended to use UDP)
Server host or address: Here enter the server you want to connect. You can find our global VPN server network list and their hostnames here : https://support.smartdnsproxy.com/article/130-vpn-server-locations-addresses
3. If there are any certificates on this page, remove them with the trashcan icon to the right.

5. Download CA certificate file from here https://network.glbls.net/openvpnconfig/serverlocation.crt and open it on Wordpad for Windows or TextEdit for Mac, then COPY and PASTE to “Certificate data” field. Enter “CA-OpenVPN” to “Descriptive name”.


9. Click on Add in the lower-right to add a new VPN connection.
Protocol: UDP or TCP (we recommended to use UDP)
Server host or address: Here enter the server you want to connect. You can find our global VPN server network list and their hostnames here : https://support.smartdnsproxy.com/article/130-vpn-server-locations-addresses
Server port: pick one: 53,54,80,81,443,444,1194 or 1195
Description: Enter any name you want to describe this VPN connection. You may enter something like "Getflix Netherlands".
User Authentication Settings: Fill the Username and Password fields with your VPN username and password. You can find your VPN username in your account VPN section.
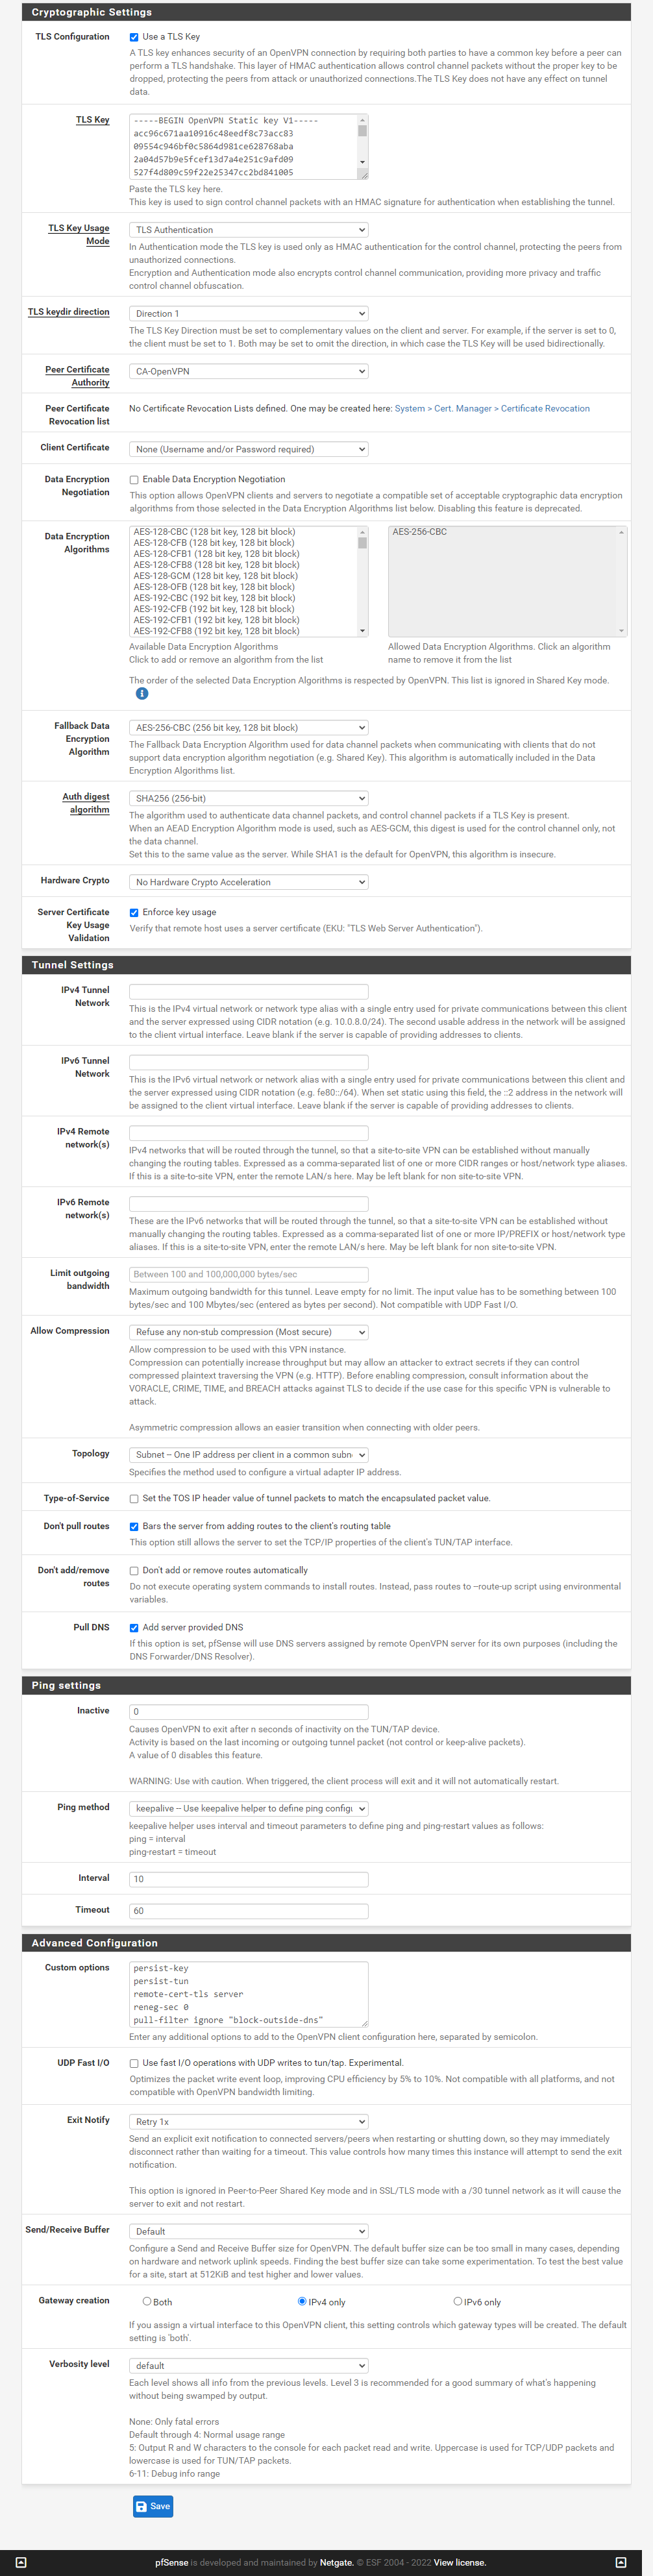
TLS Configuration: Ensure Use a TLS Key is enabled. Paste key from TLS Key.
Description: Enter any name you want to describe this VPN connection. You may enter something like "Getflix Netherlands".
User Authentication Settings: Fill the Username and Password fields with your VPN username and password. You can find your VPN username in your account VPN section.
TLS Configuration: Ensure Use a TLS Key is enabled. Paste key from TLS Key.
Usage mode is TLS Authentication Key
Direction is 1.
Peer Certificate Authority: Select the CA-OpenVPN setup.
Client Certificate: None (Username and/or Password required)
Encryption Algorithm: AES-256-CBC.
Auth digest algorithm: SHA256 (256-bit).
Allow Compression: "Refuse any non-stub compression".
Custom options: Copy and paste the following into the custom options textbox:
persist-key
persist-tun
remote-cert-tls server
reneg-sec 0
pull-filter ignore "block-outside-dns"

10. Click Save to save the VPN connection.
11. Navigate to Status -> OpenVPN.
12. If Status doesn't show as "up", click the circular arrow icon under Actions to restart the service. If it still does not come up, navigate to Diagnostics -> Reboot to restart the device.
13. Ensure that Status shows as "up" before continuing.
15. Set the Mode under General Logging Options to "Manual Outbound NAT rule generation (AON)", and click Save.
16. Under the Mappings section, click the duplicate (dual-page) icon on the right for the first rule shown in the list.
17. Set Interface to "OpenVPN" and click Save at the bottom.
18. Repeat the last two steps for all remaining rule shown under Mappings, until every rule has a duplicate for OpenVPN.
11. Navigate to Status -> OpenVPN.
12. If Status doesn't show as "up", click the circular arrow icon under Actions to restart the service. If it still does not come up, navigate to Diagnostics -> Reboot to restart the device.
13. Ensure that Status shows as "up" before continuing.

15. Set the Mode under General Logging Options to "Manual Outbound NAT rule generation (AON)", and click Save.
16. Under the Mappings section, click the duplicate (dual-page) icon on the right for the first rule shown in the list.
17. Set Interface to "OpenVPN" and click Save at the bottom.
18. Repeat the last two steps for all remaining rule shown under Mappings, until every rule has a duplicate for OpenVPN.

20. Finished. At this point, your VPN service should be fully operational! If you find that it's not working at this point, navigate to Diagnostics -> Reboot and restart your router.